11111111111111111111111111111111111

Search this website

{2011}, a year full of great things...{2012}, a year where great things can happen


So, Christmas is over...and the decorations are still up.

I'm giving myself until 1/2/2012 then all my decorations will start making their way into boxes until next year.  This seems to always result in a minor panic attach because my home seems so bare afterwards.  I feel so blessed because I have so many wonderful  Christmas Decorations and, I also have a Christmas Ribbon addiction.  It was a great holiday for me and my family. We couldn't all be together but shared our love through Facetime.

With Christmas gone, and the New Year right around the corner, I've started to compile my 2012 Goals, both personal and business.

Top 3 Personal
1.  Stop having expectations (this one is gonna be tough).
2.  Use fewer Paper Towels (I'm lazy about how many I use when a rag could be used instead).
3.  Workout 4 days a week, no matter how short or long.

Top 3 Business
1.  Invent 2 New useful products.
2.  Add 1 more Wholesale Retailer to the list of stores selling Handmade by Hilani
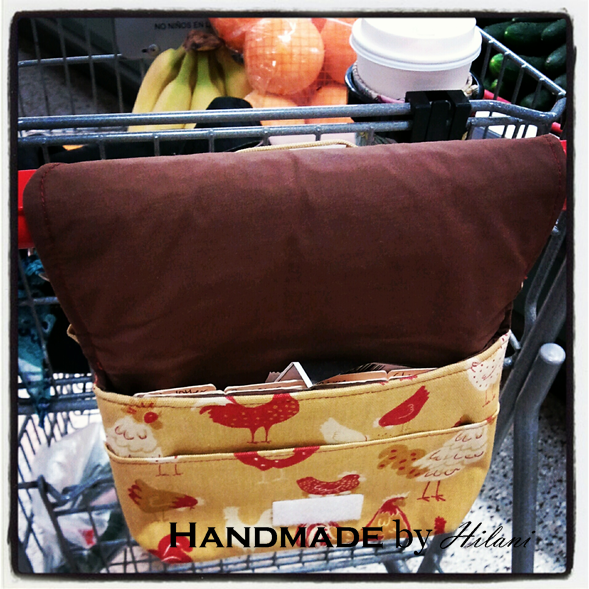
3.  Giveaway two Coupon Organizers to families that could really use one.


Up My Sleeve...Coming Soon


1.  Kids, Valentine's Day Card DIY - glitter, construction paper, home printer and scissors. 
I've been doing this one with my 6 1/2 year old since he was 3.
2.  A great Football Party Dip - Cream Cheese, Brown Sugar, Caramel, and Crushed toffee bars.  Green Apple slices dip into this sweet goodness!
3.  Coupon Organizer Giveaway - I'll be pairing up with another blogger (details to come) and giving away one of my handy, dandy Coupon Organizers. Here's a story from a recent winner: Carmella, from Creative Carmella


Enter your email address:


Delivered by FeedBurner

Pin It

Is on Vacation...


Now, I'm not really in this wonderful escape above, but I am in my own personal escape, the one of Christmas with family.  I'll be taking from December 16 - 27th off from posting here on my blog.

You can visit the following areas for inspiration:


Merry Christmas from our Family to yours....


Pin It

Thursday Thoughts....

When people walk away from you, let them go. Your destiny is 

never tied to anyone who leaves you. - Marilyn Monroe
Pin It

Coupon Organizers, iPad Covers, and wallet's Oh My...

Is stitching along on my Custom Orders to-do list. The satisfaction of completing something is very rewarding.


Pin It

Sale, Sale, Sale....15% off current inventory items

I'm having a sale on some inventory items I currently have in stock.  Everything is 15% off.

You can view them here, on my Facebook page


Happy Shopping! 


Pin It

Hanging Ornament Ball {Centerpiece}

I'm giving my girlfriend Casey total credit for this project.  It was too cute to keep to ourselves ~

Hung by Silver Thread from her Chandelier
Roughly 35 Balls were used
Start in the Center and work out


Great Conversation piece.


Pin It

Something I often remind myself....


Pin It

It's beginning to look a lot like Christmas....

With Thanksgiving behind us, my inner child is surfacing very quickly as I spread Holiday Cheer throughout our home...


Below are pictures I've taken to capture the spirit of Christmas in our home.  I hope a few of them inspire you, when you decorate your personal space this holiday season.


Our home builder thought it would be creative to make the front door larger than the standard size. This made it hard to find an over-the-door wreath hook that was long enough to display my wreath in just the right spot.  I decided to take matter in my own hands and use ribbon (one of my many addictions) to hang it as low as I'd like. 


As people come and go throughout our home this time of year, I thought it would be neat to display our received Christmas cards on the back of our front door. 


When you enter our home, this wreath hangs above a black, distressed bench. A bench where jackets and shoes are gathered.  I liked the idea, because of it's location, to incorporate a hint of the outdoors with this lantern and then fill it with small, red Christmas ball ornaments.


Our advent calendar are stockings which trail up the staircase starting with number 1 at the bottom.  Each night a little something is left for the boys to enjoy.


I'm a sucker for anything that makes my boys go "Oh, Ah..." so when I noticed a great place in my dining room to creatively display a Snow Village, I jumped on eBay and started shopping. This is a Department 56 "The Original Show Village" collection.


I have a thing for vintage books and snowman.  I like to put them just about anywhere possible.  These pieces are displayed on our living room cabinet. 


Love is....spoken here


Also in our living room, is our Fake Christmas Tree. Sadly, iColorado, due to it's dry climate, a real tree put up this early would probably not survive. The tree has red, satin bows, small, gold balls, rustic snowman, and many picture frame ornaments. I underestimated the amount of reminiscing that would come when setting up the tree...sigh...

(This is my littlest peanut enjoying the tree)

One of my favorite pieces, a Snowman Cookie Jar I got from Pottery Barn 6 years ago reduced from $65.00 down to $15...score! :)


Lastly, a sign I enjoy seeing everyday...


Merry Christmas from our house to yours!


Pin It

Peppermint Bark - {So Easy}

I decided to try something new this year for my 'offering' at holiday happy hours.  I searched Peppermint Bark into Google and of course, Paula Dean's recipe generated first in the results.  I can't believe I haven't made these before because it was very easy!

Below is her recipe with variations 


Total time from start to finish: 40 Minutes - 10 prep, 30 minutes freeze

Ingredients:
1 cup of Crushed Peppermint Candies - I used Candy Canes (7)
Peppermint Extract - 1tsp
6 cups of semi-sweet chocolate chips (a staple I always have on hand)
1 small to medium Cookie Sheet
Parchment Paper, enough to cover your cookie sheet

Preparation:
Melt either in Microwave or Double Broiler style your Chocolate
Add Peppermint Extract - Stir until well mixed
I added 1/2 of the Crusted Candy Canes at this point - Stir again
Line Your cookie sheet with the paper
Pour out your chocolate mixture onto the paper
Try to spread evenly
Once spreading is done, sprinkle remaining candy on top
Place in Freezer for 30 minutes.

Assemble:
Chose a serving dish
Remove Bark from Freezer
Break into irregular pieces

Enjoy, and happy holiday-ing!


Pin It

{Jingle Bells} - Door Accent Tutorial


I just love the sound of Bells during Christmas.  I have them on frequently used doors throughout our home.  
I've been holding onto a great find from the $1 ribbon bin at Michael's, until I have just the right project for it.  This "Merry Christmas" ribbon,
 which was right up my alley due to it's price and vintage appearance was a great find.  

I was browsing the isles, at our local Hobby Lobby, when an idea called out at me.  A canister of vintage/rustic bells called my name from a 50% off shelf.    I decided, that moment, I was going to create a Door Bell accent with them and the ribbon.  I excitedly dropped them into my cart, and while hearing their distinct Christmas jingle, my creative wheels started spinning..."What exactly should this craft look like when I'm done?"
I remembered, while driving home, that a week prior I threw in my cart a bag of wooden Stars from the clearance section at Michael's.  That too was a great find because the 
set of 4 stars were only $0.47. 


Below is a tutorial on making this Jingle Bell Door Accent.  


Project Time:
45 minutes - 1 hour (Ideal for naptime)


Supplies Needed

Purchased Items:
Ribbon $1.00
Bells $4.99 (mine were 50% off)
Wooden Star ($0.47 clearance)
Scrap Fabric - Two contrasting colors or One (FREE)

On Hand Supplies:
Craft Glue
Close Pin
Pencil
Rag (for sticky fingers)
Damp Paper towel

Step 1:
Trace on wrong side of fabric for Front fabric choice, if using two different prints.


Step 2:
Free Hand an additional trace line about 1/2 an inch larger, for cutting, around the actual star size.


Step 3:
If using a second fabric, trace on right side of fabric the star.
Otherwise, trace a second star on your first fabric making two star cut-outs. One larger and one exact.


Step 4:
Get Glue and Star ready for gluing.
Place wooden star on wrong side of Fabric and cut slits into into corners of fabric for easy folding over.


Step 5:
Apply Glue to wood and begin folding over fabric.


Step 6:
When corners fold over, cut off excess fabric.  To adhere the corners from lifting, 
smooth over extra glue with  your finger.


Step 7:
When finished this is how the right side should look.  Turn over with wooden Star exposed upwards, and apply your second fabric star on top.


Step 8:
Grab your bells and ribbon. Cut Ribbon 30" long, or more, you can always shorten your tails. Be safe, cut longer. :0)


Step 9:
Find the middle point of your ribbon. Apply glue to the center of the star on the fabric.
Wrap your ribbon around the star. Place glue at the top of the star, between the two ribbons, to merry them.  Hold them together with a cloths pin. 


Step 10:
Count out 11 - 12 bells and begin to thread them on the ribbon.
Thread 1 bell on each strand and the third bell onto both strands.  Continue to thread until you've used all bells.


Step 11:
Find a door to hang them from for ultimate drying of glue (while cloths pin still attached).


I hope you enjoyed this tutorial and it inspires you to make one to fill your home with sounds of Christmas!


Pin It

ShareThis