11111111111111111111111111111111111

Search this website

Little Girl Jeans gone too short - Up-Cycle Project

Hi Everyone, I have a fun Up-cycle Project } to share with you for great jeans gone too short. 

On my, If I had a little Girl, pin board, I pinned this great pin a few weeks back.
I found it very ironic that a few weeks later my sweet friend came to me asking for some suggestions on how to prolong the life of her daughter’s great jeans that were now too short; I had just the idea.   

She and her daughter both agreed this was the right
fix for her still-in-good-condition jeans.

I invited them over to explore my large (very large) pile of fabric for her to choose which she’d like to use.  The little girl Allie was overjoyed at the possibilities,
 she had trouble containing herself. 

I had her wear the jeans, and with scissors, made a small cut for where I planned to shorten and give a reinforcement stitch to stop fraying after washing. 


I then cut 1.5 inches high strips and the width of the leg, all the way around.  I cut two strips for variance and gave it some visual detailing you wouldn't get with one big strip.


Below is a picture of her wearing one of the three pairs of jeans we up-cycled.

(she's so stinkin' cute)

Side Note/Tip:  Seeing that there wasn’t a back link to the pin, extra information wasn’t available to someone wishing to recreate this.  So I have a {tip to share}: My friend shared the fabric frayed right out of my top stitch after washing...so I applied Fray Check all the way around the raw edges.  This turned out to be a big project saver; Have I ever shared how Much I love Fray Check?!  The step was tedious but worth it because the detail fabric stayed secure after doing so.

There you have it, make jeans last longer with a little fabric detail and some thread.  This project could be accomplished with a machine or hand stitching. 


This Post Shared @:


Pin It

Gift Idea for everyone


Hi All, Hope everyone a great Sunday, and Father's Day for those with kiddos!

Below is a picture of the gift set me and the boys put 
together for the hubby. 


Supplies:
Faux Paint Cans from Micheal's Craft Stores ($3.99 each)
1 Bag of Pecans (or which ever nuts you prefer)
1 Package of Chocolate, or sweets of your choice
Card Stock
Scissors

Overall Price: $11.00

We created the Candied pecans from an old recipe I use during the fall with pumpkin seeds, straight from the pumpkin when carving our jack-o-lanterns.  I then opened a new, blank word document and used different shapes to create the labels. I then printed them on card stock, cut them out, and had my oldest taped them around the canister. 

My husband doesn't really need anything so a sweet gesture of homemade candied nuts and chocolate brought 
him smiles all morning.  The homemade gift made my oldest very excited as well.

Hope this inspires you to make something homemade...

Until next time.


This Post Shared @:


Pin It

{Sewing Tips and Tricks} Lesson 1 of 3

So, I've been talking a lot lately about offering a sewing tips and tricks series...well, here's Lesson 1.

Below you'll find 4 videos paired with images and information.  These videos, and information, are geared towards getting you started in the right direction of sewing successfully.


In this lesson, we’ll be reviewing:

Sewing Needles, Thread and Bobbins, Cutters & Rulers, and Push Pins

  
{  Sewing Needles } 


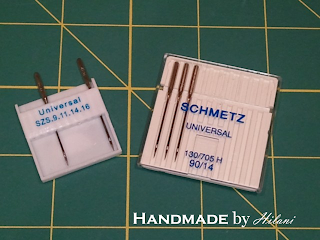
As mentioned, in the above video, choosing the right needles helps to avoid troubles with your machine, and sewing projects.


Review:  The needles on the left are a bargain, but not the best overall notion to have in your stock.  The life of them isn't as long as the name brand. They are o.k. to use, for occasional sewing, but for regular sewing, their life is short. 


{  Bobbins and Thread }


As mentioned, in the above video, choosing the right thread, and bobbins produces better sewing lines.


To see a more detailed description of Threads and the different types, click here

Review:  The thread on the left is a bargain thread, which usually have more fibers loose on the thread, which in turn, causes problems with your machine acting up (we'll visit more of that in Trouble Shooting - Lesson 3). 


To view more on Bobbins click here
#5 specifically confirms my opinion on plastic bobbins and metal. 

Review:  The bobbin on the left, the plastic one, is sometimes the culprit for bad sewing lines because of it's light-weight construction. Where as the metal, allows for proper distribution of weight inside the bobbin housing.


{  Cutters and Rulers }


As mentioned, in the above video, having a rotary cutter and ruler makes for a happy sewer.  I buy my rotary blades from Fabric.com because they have the best prices. 


Review:  The rotary cutter, the next best thing to slice bread, is a must sewing have!  The orange scissors, your grandma had a pair, 
shouldn't you. :)


Review:  The ruler is the next best thing, it allows for better cutting.  We'll review that more in Lesson 2.


{  Push Pins }


As mentioned, in the above video, having the right push pins helps you sew better stitches and fewer broken needles.


Review:  The Quilter Push Pins are great, but not for sewing at the machine.


Example: Notice how the ball of the larger needle pushes up the foot and makes the fabric taller, causing for crocked sewing lines. :(


Example: Notice how the smaller push pin doesn't raise the fabric and therefore allowing straight stitch lines, and fewer broken needles. :)

Well, there you have it, Lesson 1.

Lesson 2:  Sewing Straight Lines, tips for sewing buttons, and vinyl.
Lesson 3:  Troubleshooting..what's wrong with my machine?!


And, why not throw in a { Giveaway }...want some FREE fabric??
This Giveaway - US Only!

Enter to win the below fabric from my good Friend Jennifer at Sisboom

I have a little over 1/2 a yard to gift.

check out this awesome bag I made from it! Summer Purse


a Rafflecopter giveaway


See you next time for Lesson 2.  I'll be giving away this fabric.


Here's a Link to Lesson 2


Free Shipping on orders $35+


This post shared @:


Pin It

{Pass it On Project}


So, I got an email from my online BFF, Creative Carmella.  She asked me if I wanted to participate in the {Pass it On Project}.  "Yes, Of course", I said because anything that got us to do something together, I couldn't pass up. :)

To read more on the Pass it On Project, click here

Seeing that I had a little time before I was to receive my items from her, I started considering what I would make, and with whom I'd share.  After sending out a few emails about the "Pass it On Project" I was happy to hear back from my girlfriends Amy at One Artsy Mama and Ginger at Literally Inspired.  They were excited to participate.  

Below is a picture of my package of goodies from Carmella.


Here's a picture of what I sent to Amy and Ginger.  Sounded fitting. 


They both Received 2 Friendship Bracelets (picture below) as my Handmade gift.

To see a tutorial for this bracelet, click here


Now with Amy, I kind of cheated. You're suppose to send two items (but there's different rules going around), one for them to keep and one to pass along.  I included one of my Re-Usable Drink Sleeves too because she's a huge Starbucks fan and I had just the right Drink sleeve fabric on hand. 

So, there you have it. :)  A successful Pass it On Project
To read Amy's post about her participation, click here.


If you decide to join in, let The Space Between know, and have fun passing it on. ;)

What's to come, here at Handmade by Hilani:
A Sewing Tips and Tricks series
Summer Giveaway
{Post} Little Girl Jeans gone capri, with an accent of Fabric

Thanks for staying connected:
Follow via Google Friend Connect


Linked Up/Shared @:
DebbieDoo's
Skip to my Lou
Sew Can Do
Make the world Cuter
Cherished Handmade
Family Home and Life
Creative Itch


Pin It

ShareThis