11111111111111111111111111111111111

Search this website

{Craft Show} - Selling your products


Hey All!

I realized while helping a girlfriend (Casey Biggers, my personal stylist and sewing apprentice) set-up for her first craft fair that I should share with everyone my found knowledge with the hopes of inspiring you to take the leap of presenting your products, in a Craft Show environment.   

Now, I'm not a seasoned craft show seller by any means so what I'm about to share is my views and opinions thus far in my Craft Show career.  I've had the pleasure of meeting and talking with those who've been selling for many, many years.  With their tips, and my own, I feel sure that the information I'm about to share could get you off on the right foot to 
{Craft Show Success}

There's a few parts to this so I'll break it into sections.  

{Section 1}
Your Products and Display

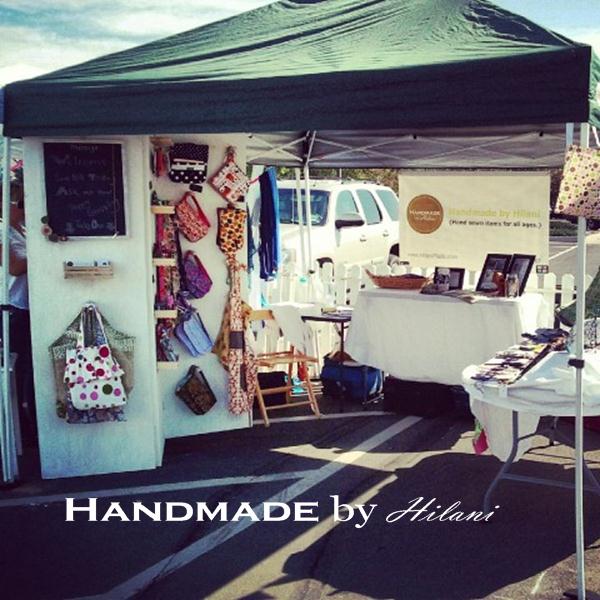
I have over 30 different Hand Sewn pieces I create and sell.  At my first show, I displayed everything atop white table linens across (2) 6 foot tables.  Now while that was a good start, I felt this year adding a more versatile display would enhance the buyers shopping experience.  
In comes the handy husband, a contractor with 13 years experience and who loves a challenge. 

Conversation:
"Honey, I need a wall built for my display to hold everything, like you'd find in a store" ~ Me

"Umm....OK" ~ Mr. Handmade

After much round & round of peg board, back drops, and chicken wired frames ideas He (giving credit here) came to a decision 2 weeks later.

"I've got it...we'll buy hollow core doors, hinge them, and create a zig, zag wall" ~ Mr. Handmade

"Love it, make it happen pumpkin, then I'll white wash paint it" ~ Me


To hang display the items on this wall, he purchased Dowel rodes and cut them down to 6" rods. Then, attached them to the wall, in such a way, so they could be removed during transporting.


Price Tagging Bulk Items: I price tag every handmade piece but now I have several popular items that sell a lot at once. I wanted a fixed price tag displayed at each dowel, for that product. I bought wooden gift tags, and chalk painted them. 

{Section 2}
Setting Up your Booth

It's important to put yourself in the shoes of the shopper.  Consider how "you" might like to shop when buying from someone.  Do you like an open floor plan or a closed one? Meaning, walk-in or a table right at the front.  

I'm an open floor plan kind of seller.  I like to invite people in and stand towards the entrance to greet and chat with those walking by or coming in.  It's my style, you might find you have your own.  

A Banner, across the back is optional.  I scored good on this one from Vistaprint. They always have great coupon deals via Retailmenot.com They are my main website for all my printing needs. 


My Helper, Mr. Handmade, putting the dowels and baskets on my finished wall.  


Remember my Front Porch Sign?  I borrowed it for the day, to display a [Call to Action] for potential customers passing by.


The Finished Booth


Above are a few things I wish to point out.  


And to add a bit of my personality, I added a fun burlap banner, with Fabric Letters spelling "Handmade", in fun polka dotted prints.  I gave a tutorial for it here, in a Fall theme, which sits in my family room.


{Section 3}
Day of Show

It's super, duper important to have a protein packed Breakfast (did you know protein fills you up longer, not fiber?)  I ate at 7:30a and didn't eat again until 12:30.  I enjoyed water a bunch, but food, it was much later in the day.  The preparation and then flow of crowds, keeps you busy. 

I also prepared my food for that day ahead of time.  Everything should be bit size; my PB & J sure was. You only have a moment to sit down, and while I had help (Mr. Handmade), they can't sell your passion for your products like you can so you stop munching and start sharing/talking.  


That brings me to having help; have it, not for the whole day but for at least the middle of it.  It's your savior for potty breaks (yes, I said potty - he, he) and for those quick bits.  

And, don't forget mints...no body wants to be close to un-pleasant breath.  Just sayin'

And lastly, your products and your supplies.  I used two suitcases, easy to roll around, and a trunk.  


I've created a craft show check list, you can view it here.

For tips on Being a Small Business, and Customer Service, visit my YouTube video here

I hope this post inspires you and helps you to be successful at selling you passion/products at a Craft show.  

Comment and let me know what you think; Would love to hear from you! xo


This Post Shared @:


Pin It

Fall Porch Decoration via {Achieving Creative Order}

Hi Everyone, I have a treat for you today!  A post about a Fall Porch from a blogging friend, that I've had the pleasure of meeting in person.  It's funny.  I found her via hopping around blog land (a regular thing) and found out she's local.  We meet up and surely enjoyed our visit.   I quickly asked if she's be willing to share one of her projects with my friends, you all.  She happily agreed and I'm so glad, because I love this project. Thanks Susan...take it away. 


Hi everyone! I'm Susan from Achieving Creative Order
I'm so excited to be here today to guest post on my friend Hilani's blog. I'm also excited to share my latest Fall project, which also happens to be on my front porch.


It all started when I spotted this cute lil' chippy gate at a vintage gift shop here in my town. As soon as I saw her, I knew she belonged on my porch. And not just on my porch, but hanging on a large wall near my front entry. 


I also came across this reclaimed wood Welcome sign (for under $10 I might add) there as well and decided I was going to marry the two somehow. 


So, I nailed a picture hanging bracket to the back of the sign,


added some fall garland I already had, and hung the sign to my gate.

Pretty cute right? I thought so but I also thought it needed a little more "fall".


So, I went to Hobby Lobby and snatched up some very inexpensive chipboard letters, ribbon, and fall-colored scrapbook paper.


The first thing I did was decide which paper I wanted for each letter and trace them appropriately. Once I cut them out I decided I needed to do something with the edges of each letter.


 So, using my stash of spray paint I painted the edges of each letter to somewhat match my scrapbook paper.


Because this is an outdoor project, I grabbed a bottle of outdoor-purposed Mod Podge. 


And once the letters were dry, I adhered the paper to each letter.


I then hot-glued my ribbon to each, creating a sort of loop.


See where am I goin' here?


Using little nails, I was able to hang my ribbon under my welcome sign.


I'm so excited because I am already thinking about how I can continue to use my gate for other seasons/holidays. Stay tuned for that. :)


Until then, "Welcome Fall" everybody.

If you'd like to see more of what's going on over at Achieving Creative Order, please stop by for a visit. Whether I'm organizing a space for a client or finding ways to make things run more smoothly (and look more pretty) in my own home, you can always bet there will be SOMETHING going on. 

Organized pantry
Playhouse under the stairs
Command Center 
Laundry Room Reveal
Achieving Creative Order

Consider following me on Facebook, or Pinterest

Thank Susan!  

xo, 
Hilani
Pin It

{Surprise} Giveaway - First Day of Fall


Hey everyone, 

I'm so excited, giddy, and overjoyed that today is officially the First day of Fall.  So, as a way to spread my joy with you, I wish to offer a fun Giveaway that so many of you are going to enjoy.

View the below {Video} to see your Surprise Giveaway.  Then, enter via the Rafflecopter below.


Giveaway is open to US and Canada only. 


Pin It

Fall Decorating {Candy Corn Project}


If you've been here for a while, thanks for following, and if you're new let me share that Fall is my favorite time of year!  And while my initial decorating is complete, I'm still adding handmade touches.  I so enjoyed making and hanging my Fall Bunting, in our Family room. 

On that note, I've added something else.  I purchased a few weeks back a small wooden frame from our local Goodwill with the intent to use it for some form of decorating.  And being a lover of buttons, I realized I need to use both together.  Then creative juices got me to thinking I needed to incorporate remnants of Burlap from my sewing studio. 

Here's the end result.

Candy Corn Anyone...


The project was under $5.00...gotta love when that happens. 


Pin It

ShareThis